I have pinned this post to the top of the page so the instructions are always easy to find. If you are interested in the other blog posts please use the menu of recent posts on the right.
These pages originally written and compiled by Karen Horne between 2011-2014 for CatandCaboodle.com (defunct). Karen kindly passed copyright to me in order to keep this valuable information accessible. Thank you so much Karen for allowing me to maintain this information! Photos remain the property of their original submitters. Photos and text may not be published in whole or in part without permission. Please link to this page instead.
For $140 or Less (2011: About $200 for a very large size)
And Almost No Tools,
You Can Build Your Own Inexpensive, Custom, Semi-Permanent Outdoor Cat Enclosure

NOTE: If you own your home and have a smaller, fully-enclosed fenced yard, instead of building an enclosure you might consider this alternative from “http://catfencein.com/Cat Fence-In.
Benefits of this enclosure:
Flexible design that is completely customizeable to fit your space
Can be put on almost any surface
Permanent, yet able to be dismantled & moved (great for renters!)
Can be built by one person, even those with little experience with tools
Light enough for one person to slide, or 2 people to pick up and move, yet windproof and heavy enough that your kitties can’t crawl underneath
Drawbacks:
Height should be limited to 4 to 5 panels tall (app. 56″-70″)
Limited ability to add steps and levels to enclosure sides
No human-sized door (crawl-through access panel only)
Introduction
If you’ve shopped for outdoor cat enclosures, you know that they are expensive. Building one yourself is complicated (even with plans) and requires tools, and still there’s no guarantee that the materials alone won’t cost as much as if you’d bought a kit.We thought of buying a http://www.kittywalksystems.com/, but even they are expensive for the kind of area we wanted to use for our cats. The limited vertical space of that system got me thinking, though: if cats can be content with such a limitation, why can’t I just make one out of materials with which I’m already familiar?
Tools and Materials needed:
For this project, you’ll need the following tools and materials:

A mallet
A pair of pliers OR a pair of gloves
Wire cutters/dikes/diagonal pliers (all terms for the same tool)…and that’s it.

About 6 boxes of wire cube storage: $20 each at Target ($120) as of 2008. (2011: These now come in boxes of only 4 cubes, for $26. Be sure to shop for these at yard sales and in thrift stores, where they frequently turn up.) The number of boxes of course depends on how large you want your enclosure to be, and how tall. The one shown on this page used 6 boxes. (2011 equivalent is 9 boxes.)

1 bag of 1000 7″ or 8″ cable ties (also called zip ties or tie wraps): $20 at home improvement stores. For smaller projects, 3 bags of 100 ties each might do, but after that you’re not saving money by buying the smaller bags. Besides, cable ties – like duct tape – have an infinte number of uses. Having leftovers is a great thing.
Directions
There are no directions, but I have many tips for you.
The reason there are no directions is that the box tells you how to put the cubes together, and I can’t tell you what the shape and size of your enclosure should be. But here are tips for building your perfect enclosure:
Access: Determine how your cats are going to come and go into their new outdoor playhouse before putting it together. If you need a panel with a cat door in it for a door or window, that will cost you more than the enclosure itself (we had to buy and install an all-weather panel to fit against our sliding-glass door). Cutting a hole through a wall and installing just a cat door is much cheaper, if you’re handy or know someone who is. Finally, in the pleasant-weather months, if you don’t need or use air-conditioning, and have a sliding screen door that you don’t mind butchering, you can cut a 14-inch square hole in one lower corner of the screen door, close the screen, and allow the cats to come and go through their 14-inch opening straight into the enclosure.
Design: The 14-inch square panels are strong, and so are the connectors, but I wouldn’t advise building an enclosure that’s more than 4 or 5 panels high, and your cats won’t need something that tall, anyway. The one I built has several sections to it, but the only section that’s more than 4 high is one on the end to accomodate a tree limb for climbing, and that section is only 2 panels square. If you’re already familiar with this product but haven’t purchased it recently, you should know that they’ve changed it so that some panels have 8 wires across and some now have only 4. It doesn’t matter which you use where, since even the ones with only 4 across still leave a hole too small for a cat to pass through. If you’re ever going to have kittens in your enclosure, though, be sure to use only the 8-across panels on the ground level, as a kitten can easily walk right through the 4-across panels.
If you’re going to build a run instead of an enclosure (as in the Kittywalk system), your cat will be happier if you build it 2 panels high (28″). Don’t put a bottom on your enclosure – your cats won’t like trying to walk on wire mesh. The enclosure can sit down directly on a deck, patio or grassy area, and its own weight will keep it from moving much (although it can be picked up and moved by 2 people). Your cats will not be able to crawl underneath, unless this is put directly on soil and you have a digger.
Construction: Your mallet will come in handy for tapping the panels into the connectors securely, squaring up sections that need it, and is pretty much mandatory for removing connectors from groups of panels that have already been joined. The nice thing about these materials is that you’re free to experiment and make mistakes: if you don’t like what you’ve done, just cut the tie wraps, pull it apart and start over.

What makes this so sturdy is the addition of the cable ties. Wrap a tie around every joint (every place corners of two or more panels meet) next to the connector. Pull them tightly using a pair of pliers, or your hands if you have gloves (one or the other is necessary; they’ll chew up your hands pretty quickly otherwise). Once you have the ties tightened, cut off the remaining portion with the wire cutters.
I was careful to face all of the cut sides outward, as the cut ends can be very sharp, and I didn’t want them as a hazard to my kitties. Thus, the joint you’re seeing in the photo above is facing the outside of the enclosure.
You may be wondering why you were told to buy such long cable ties when you’re cutting most of the tie off. The problem is that the smaller the tie, the less tensile strength it has. 7-8″ ties have a tensile strength of 50-75 pounds; the shorter ones have considerably less.
The Access Panel: You have to have a way in yourself to add goodies for your cats to lay on and play with, and to get them out when you need to and they don’t wanna (although luring them in with a treat is easier!) This is solved by making a 4-panel section be removeable.


Because it can’t be permanently tied to the rest of the enclosure, you have to stabilize this 4-panel section with cable ties. This was how I did it. (For the longer ties, notice that I cheaped out and tied two or three to each other to make one long tie, instead of buying longer cable ties.) The resulting panel will flex but won’t come apart, and it attaches to its “wall” by only the two top and bottom “feet”.
You’ll have to play with this to see what I mean, and to decide what will work best for you. Make sure it will attach to the rest of the structure at 4 points, but not so securely that it’s difficult to remove.

This joint has its connector with the smooth side facing the access panel, instead of connecting to it. The access panel’s wire panels are connected on the sides only by tie wraps.

And your enclosure is done! I added a large tree limb ($ free), which was already pre-cut by one of my neighbors. Your cats might appreciate feline-safe plants, but keep in mind that you won’t easily be able to get in every day to tend them if they need more than watering. (2012 Update: You’ll be happy to know that this outdoor enclosure has now lasted 5 summers and 4 winters, including snow load. There’s rust around most of the joints, but it’s otherwise structurally sound, if no longer bright and shiny. It’s not in this configuration any longer, though. I discovered that none of the cats care about the height (two panels high is plenty) and took advantage of the fact that it’s so easily remodelled to, over two summers, make it into a run which wraps down off the deck and around half the back of the house.)
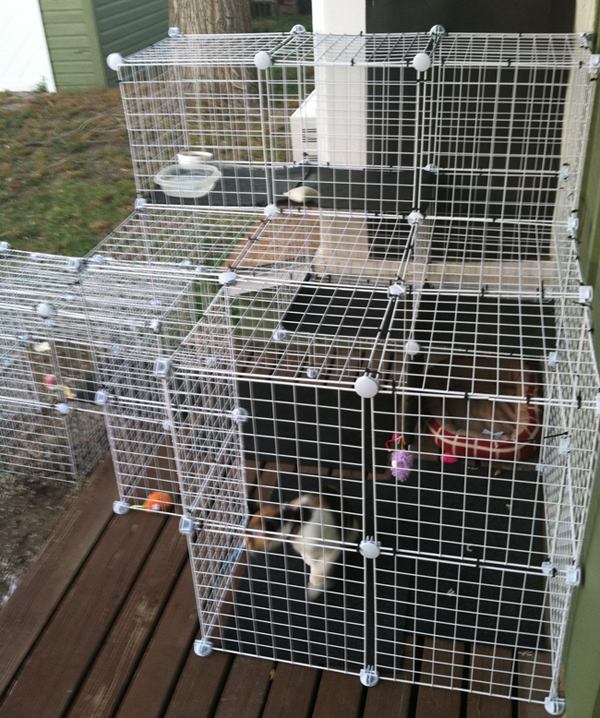
2011: Below is a photo from Diane, who built her own enclosure following these tips. If you build your own and would like to send us a picture of it, we’ll post it here.

 To the left is a photo from Tim in Colorado. To give you an idea of what a small one like this would cost, he used only 3 boxes and got them at Target while they were just $12 per box (check for sales on these around the time students are going back to school). Wisely, he bought extra boxes at that price, so he’ll be able to expand this later if he wants to. His cat access is a pet door he installed into a screen (great, inexpensive idea). You can get relatively inexpensive pet doors/flaps at Petco and PetSmart. For the solid portions you see here, which his cat needs to walk and sit on, he used more wire panels and covered them with carpet padding (plastic shelving would be more weatherproof). He used cement pavers for the bottom of the enclosure, and extended it out to cover some of the lawn so his cat could enjoy lounging (and nibbling) on greenery. Unless your enclosure is completely under a covered porch, like Diane’s, definitely think about making any other materials you use and items you put in your enclosure weatherproof. Your cat will not stop wanting to use his or her enclosure in the winter. Ours go out in both snow and rain.
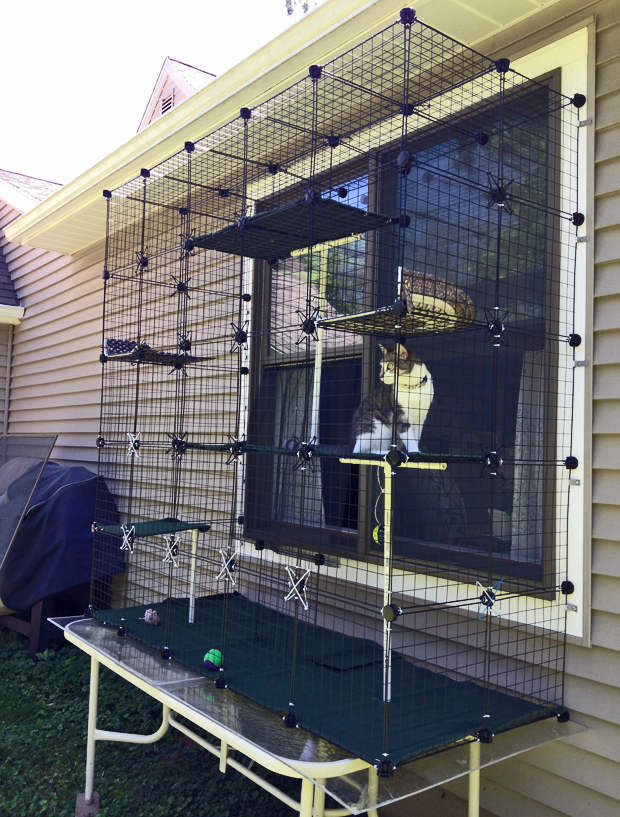
2012: Jennifer from Calgary, Alberta sent us the photos below of her own “catio” (I love that term!), showing how easy and non-destructive this solution can be if you already have one of those screens with a little door which allows you to open the window behind it. Jennifer got her wire cubes from Walmart for CAD $20 each, making this whole project only CAD $100.


 2012: To the left is a photo from Andrew near San Jose, CA. This enclosure cost him only $100.

2012: Marilyn posted this photo to our Facebook page. For the cost of only two boxes of cubes, she was able to make a starter “catio” accessed from a basement window. Her lovely Calico can get a taste of the great outdoors while she slowly expands the enclosure, if she chooses. If you have big dreams but your budget is tight, you could conceivably create a very large enclosure by just buying a box or two of cubes a month.
2012: Tudor from Portland, ME sent us the wonderful photo below of how an enclosure was created to fit into a corner of the house, from which this long-haired beauty can enjoy the cool grass. Here’s Tudor’s own description of the building process: “It took 10 of the 4-cube packages and a ton of cable ties. I made the stairs sturdy by building them as 6-sided blocks, burying them in a couple inches of rocks, and attaching them to the rest of the structure. I added a support ‘beam’ near the middle to keep the roof from sagging. Adding the (prefab) cat door to the window screen was relatively easy, but required cutting wire pieces to connect the structure to the window. To do this, I used the same type of wire square, which I cut to size using wire clippers on the interior of the grid. To cut the thicker outside edges, I scored them with the clippers, then fatigued the metal by stepping on it. I made the triangle piece for the front of the roof in the same way. I used some inexpensive, sold-by-the-foot astroturf on the ‘stairs.’ Thanks for the great ideas, Tudor!

It might be hard to envision everything your project needs before you begin building, but once you start putting the cubes together tons of ideas will make themselves evident to you. And if you don’t like how it’s turning out, simply take it all apart and start over!
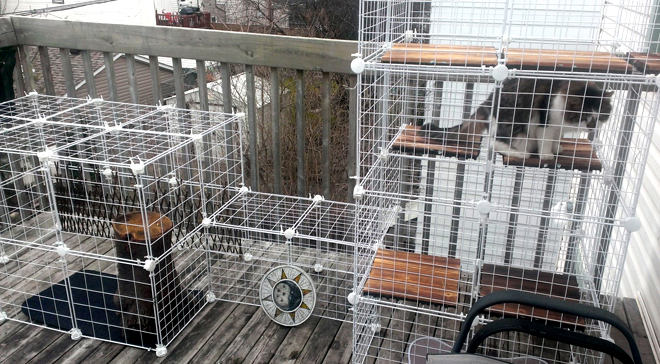
2012: Terri from Pennsylvania sent the photos below of the elaborate run she created to take advantage of all the space she could. It uses 5-6 boxes of cubes from Target and includes hanging toys and things to climb on (and in!) for interest. These photos are important for another reason, as they show what you’ll need to do when building a run that has to conform to different ground or floor levels (see red boxes in photo below). As I mentioned on the previous page, I remade our original enclosure into a run which came down off our deck. It also uses this method of overlapping and zip-tying the wire panels (without connectors) to fill in the gaps left when your second level isn’t exactly 14 inches from your first…which is always. It’s admittedly not pretty but it works and, thanks to the zip ties, remains strong and secure.


The inset photo above shows how Terri later remodeled the portion on the ground to be two panels high, after she discovered something that bears repeating: it’s important to make sections you expect your cat to spend any time in be a minimum of two panels high. They don’t need to be any higher than that unless you absolutely must make use of all the vertical space you can (in which case you’ll need to build in platforms or shelves so your cat can take advantage of it, too), but a cat cannot comfortably sit up in a section that’s only one panel high.
2012: After Shaina from Kansas found her outdoor cat inside a neighbor’s raccoon trap, she knew something had to be done to keep LuLu safe. Using our tutorial, she constructed the enclosure below.

Shaina rents and cannot make any doorway to the enclosure for LuLu, so she has to put her inside it. To facilitate this, she left one panel untied, and just removes it and replaces it. As you can see, there’s a bed in there for LuLu, and toys to keep her occupied. Much of the structure is under the cover of the porch so even when Shaina isn’t home, her cat will be safe from the elements. Shaina also used some inexpensive rubber mats (great idea) to provide seating on the shelves, and also to block off a portion of it for further protection from rain. Shaina’s looking for a new place to live, so the portability of this solution is an added bonus, since she’ll be able to disassemble and reassemble it to take advantage of her new space when the time comes. Shaina tells us something we thought we should mention: LuLu hates this “cage”. Almost all cats who are used to being able to run free outdoors will not be happy with this or any enclosure you build for him/her, at least at first. It helps to be forewarned that a lack of appreciation is something you might have to deal with.
2013: Our first submission for 2013 comes from Tania in Lakewood, Colorado, who reports that their new enclosure makes Ginger and Jake “happier than ever”. And they do look contented in this attractive configuration with two seating areas, don’t they?

As you might have guessed from the photo, the cats get into the enclosure via the window. Tania decided to use only the panels with the 8 wires across because she discovered that with the panels with only 4 wires, one of her cats could get both his head and a front leg out at the same time, so she was afraid he would get stuck, or possibly escape. I hadn’t heard of this with an adult cat before (and one of our cats is quite small), but since we now know it’s possible, you’ll want to watch your cats in their new enclosure for awhile to see how they react to it.
2013: Carrie from California posted the photo below of her nearly-completed enclosure to our Facebook page. As you can see, it’s built to fit into an enclosed patio.

If you own your home and have a smaller fenced yard, instead of building an enclosure, you might consider this alternative from http://catfencein.com/
2013: Kerstin from North Carolina built the enclosure below using about 2-1/2 boxes of cubes that she bought from Target. Salem was used to being able to go out before he came to live with Kerstin in her apartment complex, and if you’ve ever had the experience of trying to make an outdoor cat into an indoor-only one, you know how insufferable a cat can be when he WANTS TO GO OUT. But Kerstin says Salem loves his new catio, and you can see what a character he is in the bottom photo, which is from Kerstin’s Facebook page.

“I constantly marvel at the ingenuity and creativity of our readers, who are so resourceful in adapting the flexibility these cubes provide to the needs of each individual installation.
2013: Just look at this AWESOME house-hugging solution for an upstairs cat run! Photo from the Facebook page of “https://www.facebook.com/photo.php?fbid=556334894427459&set=a.216321248428827.53570.216095098451442&type=1&theater (You will have to sign in to FB in order to see it. Note that there are no instructions there for constructing this, but the photo should be adequate enough to allow you to copy it for your own installation.)

2013: Sue from Pennsylvania built the enclosure below from boxes of cubes she bought at Bed, Bath & Beyond…with coupons! (Nice going, Sue!) 2-year-old Siri can now enjoy the view from one of several shelves built into the space, which Sue supported using readily-available PVC pipe. This installation is different from the others we’ve seen so far, in that Sue wasn’t able to use the ground for support, so it necessitated several changes from our usual building suggestions. Because the bottom is supported by a table and not the ground, she did use wire panels on the bottom for more support, but covered them up so Siri wouldn’t have the uncomfortable task of walking on wire. And because a taller structure without adequate depth isn’t as stable, she used plastic strapping (from Home Depot’s plumbing department) to attach the sides to the window frame. People often call us asking what we use to attach our enclosure to the side of the house, and I tell them that because of the weight and depth of the enclosure, it shouldn’t need attaching to anything, but in this instance you can see that is not the case. (Continued below photo.)
Also, Sue noted what most others have, which is that she probably should only have built the structure 4 panels high. She found that after 4 panels, her enclosure started to become less stable, and Siri is just not interested in the higher levels. This is something we’ve found to be universally true, regardless of your cat’s fondness for higher levels inside your house, so as your particular installation allows, you are better off building OUT rather than UP. I now really regret that our original photos show the first incarnation of our own enclosure, which we later remodeled into more of a run because our cats were not interested in the height, either.Sue’s method for giving Siri access to the outdoors was particularly inventive and non-destructive, if you happen to be a renter: She removed the window screen and replaced it with fiberglass screening attached to a tension rod! Keep in mind that your cat will still want access to his/her enclosure in the winter, so if anyone comes up with a good, inexpensive way to make this type of access weather-proof, we’d love to hear it. So far, the only winter-safe access points we know of are either destructive or expensive.

2013: Here’s a tall order: How can a 60-year-old arthritic lady on a fixed income afford her own outdoor cat enclosure? Well, KrisAnn from California planned and built this entire enclosure by herself, over several days, and feels justifiably pleased at the outcome.

She started by putting some old cat trees outside under the eaves of her home (which also function as stairs for the cats to come and go through the window) and building around them. KrisAnn could not find these cubes at any local stores, but discovered that not only does Bed, Bath and Beyond http://www.bedbathandbeyond.com/product.asp?SKU=16719773” have them online, but they only charged her $11 to ship 6 boxes. (Obviously, this link may not work after 2013, and the shipping price may be quite different after that as well.) For the cats’ access to the enclosure, she bought something I’ve never seen before (isn’t the internet marvelous?!); a “pet screen door”, expressly for installing into an existing window or door screen. It’s ridiculously inexpensive and extremely simple to install. She purchased hers from http://www.discountramps.com/pet-screen-door.htm Discount Ramps.com. Their product page has all the information you’ll need, including the PDF of the 3-step installation instructions. All the materials, including shipping, for this whole set-up cost her exactly $162, and she reports that her 6 cats are absolutely thrilled with their new play space.
2013: Shown below is another installation that needed to use something other than the ground for support. Brandi from Iowa used a white shelf affixed to the house with white L brackets as the base for her enclosure. She says, “They match the house so no one really notices the shelf at all,” and she’s even received compliments on it. This design used only two boxes of cubes. Brandi bought two more boxes in case she wants to later expand it. (If you can afford it, I highly recommend buying more boxes than you think you’ll need, as there’s no guarantee that you’ll be able to find them later at an affordable price, or at all. When I started buying them several years ago, the panels to build six cubes came in one box. I don’t think anyone offers that anymore.) Brandi got creative and disassembled an old cat tree to use as the base for the enclosure. She used its seating areas as “shelves” for them to sit on outdoors. Right now the eaves of her house provide shelter from the weather, but she plans to put in more weather-resistant seating before the first snowfall (yes, your cats will go out there even in the rain and snow.)

Right now, Brandi has to open a window to allow her 3 cats access, and they’re not subtle in their demands for that window to open! So there’s no question about how they feel about their new access to the fresh air, but as it turns out, even her neighbor loves it: She enjoys looking out her kitchen window every morning, watching the cats play.
2013: Marilyn from Nova Scotia, Canada says of her new cat enclosure, “They can come and go all day and I can close the window at night, so we don’t receive unwanted visitors.” It looks like access to the enclosure is from a basement window.

2013: Laurie from Southern California built an elaborate enclosure for her two cats and then posted the whole thing on her own blog. It’s so impressive that I’ve simply linked to her blog post (click the photo) so you can see all the photos and read the details for yourself. http://toughkittypuffs.blogspot.com/2013/07/catio.html

2013:

Cathy lives near Calgary, Alberta, and set up her outdoor enclosure when her kittens, Vader and Ivy, were only 6 months old. Ivy could still squirm her way out of it, so she locked the door and tried again later. On the third attempt, they both were too big to escape from it, so now it’s open year-round. In spite of some bitterly cold winters, her cats still use it in all weather. Cathy keeps the cold out of her house by having the enclosure access in her basement. Since it didn’t have to be pretty, she also reduced the hassle of installing a cat door by simply fitting some plywood into an always-open sliding window, and installing the door into the plywood (great idea!). This would also work with a double hung window.


We both had spent weeks on various ideas and searching the ‘net and we just couldn’t find anything that was suitable and reasonably priced. One day I was surfing the ‘net and your website caught my eye. I nearly jumped off the sofa! This idea was a snap and we knocked it out in about 3 hours.

2014: Our first submission for 2014 comes from Sandra of San Mateo, CA (just south of San Francisco), who rents an apartment with a generous-sized balcony. After she found our DIY page, she managed to get 4 boxes of cubes from Target when they were on sale (score!) and built this really bee-yoo-ti-ful enclosure with access from a kitchen window. All she had to do was remove the screen from the window, and she had herself an outdoor enclosure accessible to her cats whenever they want it, with no modifications or damage to the structure itself. Her beautiful cat Tai, the more adventurous one, can now come and go as he pleases, pleasing both human and cat. Matching up the enclosure to the sliding window left a gap above the enclosure top, which a resourceful cat would quickly realize is his escape to freedom. She solved this cheaply and easily by simply using one wire panel to block the upper portion of the window, which can be seen in the photo to the left. I just love the whimsical details she added to the enclosure, which includes some inexpensive garland and artificial plants from Michael’s (also on sale), pleases the human eye but doesn’t detract from the function from a cat’s point-of-view, doesn’t take any upkeep, and helps to soften the otherwise mildly industrial look of wire panels. All in all, she has a really nice-looking enclosure that compliments her home, makes her cat happy, doesn’t compromise her rental agreement, and can easily be taken apart and reconfigured wherever she goes next… and it only cost her about $100. You can see more photos of Sandra’s catio on http://youkaiyume.tumblr.com/post/78393837608/home-made-catio-tai-got-to-play-in-it-for-the

2014: Hannah from Chicago posted this photo of her catio to https://www.facebook.com/CatAndCaboodle our Facebook page. They built it between two trees in their yard. The plastic used for seating has been secured with zip ties to the wire so it will not slide around. She writes that her cat, Kimiko, wanted to be outside with them when they were doing yard work (“Why are the DOGS allowed out but I’m stuck in here?!”), and now she has her wish.

2014: Carole Anne from Ottawa, Ontario built this lovely, rambling enclosure on her deck for her cats Junior and Zena. A friend with shop tools cut the wood piece to fit in her window frame, into which was installed the cat door. And here’s a big bonus we haven’t heard of before. Carole Anne writes of her gorgeous longhair, “Junior is no longer bored, so he hasn’t been waking me up at night for the first time in a long time.” How’s that for a big benefit!


2014: The very happy-looking lady in the photo above is the mother of Desiré from Charlotte, NC, who wrote us an email that blew us away and made all the effort put into documenting this inexpensive solution worthwhile. Desiré told us that she and her mother had been looking for months for some way to allow outdoor access for Gigi, her mother’s cat. Desiré’s mother lives on the third floor of an independent living apartment. While she does have her own balcony, she is not allowed to enclose it in any way, even with screening. They were thrilled to discover that for only $90 they could put together an enclosure that can’t even be seen from outside her balcony, but which finally gives Gigi a safe place for some bird-watching (which is what the stool is for). 4 months later, they remodeled the enclosure to give Gigi a lot more room to roam and bird-watch:


wonderful way to spoil or kitties and keep them safe.
LikeLiked by 1 person
In a nutshell. THANK YOU! I have 2 ex-outdoor kitties and they (I’m including my all-indoor kitties there) sit by the open windows and I feel so bad. I am so happy to have found this. THANK YOU for keeping this going. This spring is my kitties’ time!
LikeLiked by 1 person
Thank you for saving this page! I have been intending to make one of these for a couple of years, and I was so disappointed that the site was gone.
LikeLiked by 1 person
Great information! I’m excited to build something so our cat’s can enjoy the outdoors. Thank you.
LikeLike
So much great information, much appreciated, I was wondering how these cubes would do outdoors in four seasons and learned so much more. I still have one question though, we have a lot of squirrels in my area, are they an issue? Am I being over-cautious worrying about squirrels getting in and leaving droppings, fleas or ticks behind?
LikeLike
Good question! We have had ours up for years and it is still standing strong. No squirrel or rat problems at all.
LikeLike
I love your ideas and the wonderful information. Thank you so much.
LikeLike
I’m still trying to figure out how to stabilize this to the original structure or side of home? Do you tack it to the house? I feel like my kitties would just push a space between the cube and the side of my house, then I would have lost kitties
LikeLike
Good question, these are very rigid, especially if you use plenty of zip ties. However, my husband lashed the bottom to some 2X4 pieces we had laying around and basically made a bottom frame. Ours is completely freestanding and has been there for 5 years now.
LikeLike
We need an indoor pen! I have Bengals who get into everything when we are not here. we are retired so we leave to grocery shop etc… We walk on lead outside regularly. would these work? Of course they jump on the cage when we are home and they are out! Can they support plywood roof?
LikeLike
These would absolutely work for an indoor pen. Why would you need a plywood roof though?
LikeLike
I went back and looked at some of my pictures I have posted. On the post “New cat grass” there is a clear shot of the bottom frame. He just drilled holes and we ran the zip ties through.
LikeLike
I used fence staples. I hammered one on each side of the enclosure on the floor of my deck and one on each side of it on my wood house siding. I left enough of the staple to be able to slip in a cable tie and attached the ties to the enclosure. If I want to move it I can just snip the ties.
LikeLike
my structure is about 6 feet across, 4, 1/2 feet high and 6 feet deep. I have it pushed up directly to the house and they go through an opened screen door or a portable cat door. It’s too heavy for them to push it away from the house
LikeLike
THANK YOU for keeping this idea accessible! I just bought 5 sets of 4 cubes from Bed Bath & Beyond (used the 20% coupons – got all 5 sets for $80). My design has an open back since it sits against the house, so I didn’t need to worry about making a door – I’ll just scoot it away from the house when I need to get inside of it. I used craft foam sheets to cover the flat areas where my cat will walk/sit and threw in a couple of all-weather pet pillows.
Now, after a sprained let, an eye abscess, and another time of coming in with so many bite wounds that he’s very lucky to have come home at all, my bubba kitty just needs to adjust to the idea that this is as much “outside” as he’s going to get from now on.
LikeLike
Jenni, that is a fantastic price you got on those cubes and the craft foam is a great idea I had not thought of! If you are willing, I would love to post pictures of what you built on the blog to help others with new ideas. If you are willing, please, just email them. Thanks!
LikeLike
Thank you for keeping this information on the net. I’ve been racking my brains trying to think of a way to make a catio that can be movable when needed or stay where it is. I’ve pondered 2″x2″ boards with wire on them but am thinking that they would be too heavy and since I only need a 3 sided enclosure (going to put this against my window and put in a cat door through the screen) I was afraid that a wood enclosure would not be stable enough to stand up to our winds here. The same would go for a PVC pipe enclosure. I will be looking for cube kits on-line and in the stores to make the catio soon.
LikeLike
https://www.shelving.com/Set-of-Wire-Grid-Cubes-p/5279bl.htm
Good luck, I built a GREAT cation outside of our RV when we spent the summer on Cape Cod, then disassembled it and packed it up after 4 months to go home. It was multi level and I used our picnic table covered with indoor outdoor carpet as a base. The cubes work wonderfully; but don’t forget to secure them at each juncture with a zip tie. Zip ties can be had cheaply on the net too. My door was on the side where I left one panel secured only by metal clips vs zip ties. My old guy just loved it and enjoyed basking in the morning sun sniffing the breeze. The dog walkers strolled on by and he never gave them a second glance.
LikeLike
Thanks a bunch for keeping this info available. I just moved into an apartment with a long narrow patio that’s on the 2nd floor. The bottom of the porch is fenced in so I plan to build my catico so it peaks over the fence area. With all the pictures and ideas posted here I should be able build something acceptable to my very fussy “OSWALD” (Ozzy). And I have boxes and boxes of the cubes because I used them all over my old apartment to make shelves for my clothes, towels, etc. So I can do this pretty much FREE. While I’m waiting for the weather to become acceptable (Wisconsin), I’m starting to grow LARGE plats (containers from Amazon) of several types of grasses (oat, wheat, regular), and catnip plants to put on the bottom of the enclosure. It was a good tip about making sure I could still access the inside of the enclosure so I can water the plants and tend to Ozzy’s needs. I also have some old shelves and cat seats that I can install so he has a few areas he can comfortably “hang out”. I’m sure I can find an old tree branch that I can install to allow him to walk from end to end too. When I get this all up and operational to my “owner’s” desires, I hope to send you some pictures. So again, THANK YOU so much for your efforts with this site. It is greatly appreciated!!
LikeLike
Cube Wire Storage Shelves— COST and AVAILABILITY for white and black as of 3-13-18
Assuming size is 14x14x14
https://www.google.com/search?q=wire+storage+cubes&client=safari&rls=en&tbm=isch&tbo=u&source=univ&sa=X&ved=0ahUKEwj5_eP8o-nZAhUL6YMKHakwDuEQ7AkIxwE&biw=1908&bih=786
Specific Examples*:
Target – (Whitmore), brand, 6 for $29.49
Amazon – (Tespo, brand), 20 for 68.99,12 for $49.99
(LANGRIA, brand), 6 for 29.99, 16 for $61.99 (currently on sale as of 3-13-18),
not sale price, sale is if you buy more than one)
(UNICOO, brand), 20 for $66.99 (looks a little heavier metal)
(Amazon brand), 6 for $29.69
Replacement connectors, LANGRIA Wire Cube Plastic Connectors, 8 for $9.99
Bed, Bath, Beyond – (Honey-Can-Do Modular, brand), 4 for $19.99, 6 for $31.99
Office Depot – Do NOT but here unless you want to RIPPED off BIG TIME, 6 for $73!
Walmart – (Whitmore), brand, 4 for $17.88
(Honey-Can-Do Modular, brand), 6 for $27.19-$35.20 (don’t know why so many prices)
*plus shipping if you are having stuff shipped.
LikeLike
It took some time but finally have my Catio up and in use. Abby and Zack love it…I mean really LOVE IT! I didn’t put in any high perches but have a “Kitty Cot” one cube up on one side and have given them a live catnip plant to chew on as well as the grass. I also had an access stair that I got for our dog that we lost to old age a few years back (Abby mourned her for about 2 years 😦 Emmy our dog raised her from a kitten and Abigail adored her) and that works fantastic for access from the window to the ground and back. I tried out the “Kitty Cot” on a un-reinforced side and didn’t like how it sagged so I added on 3 panels to the back edge and tossed on loads of cable ties to reinforce the joints and it works perfectly. I’ve left quite a bit of the back open so I don’t have to look at too many wires to see out of my bedroom window. I ordered the cat door for the screen from Amazon and had a local window company make me an extra screen for my window for access to the Catio. I had the original screen re-screened; as they had put a few small holes in it going after bugs, and am storing it in our storage shed so I can leave it with the house when the time comes for me to move.
Early this morning Zackary woke me up at 3 am purring up a storm and loving on me and then he ran across the bed to the window and went outside. Three hours later I was woken up by Abby peeking in the window-door giving me a little ‘Meow”. She just wanted to say “Good Morning” and to remind me I had to move the stairs so when the sprinkler pops up under the stairway the water will get to the lawn. (oops…didn’t see the pop up when I was thinking of the catio hehe). I have a big umbrella to use to provide shade when the sun starts in the west so they can use the catio in the late afternoon. All in all I think it’s pretty successful…at least the reactions of my masters says it is.
LikeLiked by 1 person
P.S. I have photos if you would like to post them. The Catio is 4 panels tall by 3 panels deep and 5 panels long. It is partially open on the back where it faces the house.
LikeLiked by 1 person
Yes! Please send pictures, General area where you live, and any other info you will allow me to post.
LikeLike
Some of these do look loke they are attached to the house, which I prefer to be 100% certain these little escape artists stay put. My husband built our catio out of 2×4’s and wire fencing. It is a huge hit with our cats. I already had a all-weather cat door in the bedroom window that previous cats used. (I had one male that absolutely refused to stay in the fenced yard that I tried to cat escape proof with expensive cat escape proof fence modification system-catio is much better)
I’m looking for an easy but effective method to give our cats a way to enjoy the outside while camping in a fifth wheel. It would definitely have to be attached to rv. There is a post out there that uses these cubes but skips the method used to attach to rv. Do you have any suggestions? Great info on here, by the way, thanks for posting.
LikeLike
Honestly, I do not know how to attach to an RV but I can say that ours is not attached to the house and my cats have never escaped. We do have the wire cube pieces on the back side, against the house, so it is completely enclosed. My husband drilled holes in 2x4s which we set the catio on top of and he zip tied the wire cube pieces to the 2x4s. Perhaps you can try that? That way, you can still disassemble easily when you are ready to leave and adds weight so the cats can not escape. I think you can zoom in on the pictures of ours and see that. If not, let me know and I will try to send or post a good picture of that.
Thank you for your comments!
LikeLike
We have a motorhome. I am planning access via a tunnel from the passenger cab window as I don’t want to block the coach’s only door. I must cut a fitted inset to be secured inside the window. Most likely something plastic to connect a tunnel from the cab to the catio interior while blocking off the remainder of the window’s access to the outside. I ordered grid materials for the catio today; this currently remains a concept, for what the idea is worth.
LikeLike
I am renting and can’t attach to the house so seeing your comment and the one below about using 2×4’s I just had an idea I’m going to try.
I don’t want them to be able to move it away from the house and squeeze a tiny space…so I am going to get cheap hand weights, and use one or 2 zip ties to anchor the hand weight to the bottom of the cube on each side if two cubes wide and 3 if using 3 cubes wide.
Should weight it down sufficiently and they won’t mess with the weights
LikeLike
Thanks for keeping this site up, we’re in Arizona with lots of coyotes, but the cat wants to go out! These are great ideas.
LikeLike
Wow! I just ordered a set of 20 of these from Amazon set up in garage for cat beds. You gave me whole new ideas! I think I can attach them to the dog enclosure that I have set up for the cats! I needed a way to add “shelves” for beds since the Co I used to order from has gone out of business! I am SO THRILLED I saw this post! I too am in the desert with the coyotes running at night. Cat safety at night is a must around here!
LikeLike
Marlyn, that is awesome! Thank you so much for your comment.
LikeLike
I just found this site – so thankful you have kept it up. Headed to Cape Cod with the RV for the summer and was wracking my brain for an enclosure that would give our two Bengal clowns “outdoor” time. I think this is the solution versus flimsy mosquito netting enclosure/tent.
LikeLike
I ordered 2 packs of 43 black grid panels with connectors along with a pack of 1,000 8″ black zip ties from Amazon today. By my calculations, this should build a 4’X3′ long X 2′ high base incorporating a 5′ high X 2′ square tower including tops for the base & tower. I should end up with 2 extra grid panels; however math is not my forte. It’s not a huge catio but we cannot build large in an RV resort. I’m right at $122.00 for the project. Stay tuned for construction updates.
LikeLike
I rescue cats here at the resort I live at. I have a 27 foot trailer with 17 indoor cats and 1 American Bulldog. They all love their Catio. The entrance comes off the Bedroom window and then they go down a repurposed folding door that I covered with carpet. I built it myself in 2 days with no plans at all. I built it around the awning so I still can fold that down.
LikeLike
Thank you so much!! I was about to start building a wooden one even though I have no experience. This seems like the perfect solution!
LikeLike
Thank you for keeping this information on the net. I’ve been racking my brains trying to think of a way to make a catio Ideas that can be movable when needed or stay where it is. I’ve pondered 2″x2″ boards with wire on them but am thinking that they would be too heavy and since I only need a 3 sided enclosure (going to put this against my window and put in a cat door through the screen) I was afraid that a wood enclosure would not be stable enough to stand up to our winds here. The same would go for a PVC pipe enclosure. I will be looking for cube kits on-line and in the stores to make the catio soon.
LikeLike
Hi. I love this idea, & the tips & pictures are inspiring. I have to build something for one of my cats, as she is the only one who leaves the yard. I am thinking of doing something like this, if I can find cubes, as a temporary solution, until I can build something bigger, as she needs lots of space to run, & it will be on the ground, so I need a way inside. So I just wanted to thank you for posting this!
LikeLike
I just bought everything to make one of these catios!! When I get it up I’ll send photos. I saw someone else asked about squirrels. I too worry about them because the catio will be off a basement window and there will be 3 huge trees surrounding the enclosure. I worry the squirrels will get in the enclosure and fight with the cats. Do you think the squirrels can get through the holes in the grid? We live in Colorado and there are many squirrels who occupy these trees (as squirrels do in most US trees!)
LikeLike
I apologize for the late reply! I did not see the notification of this message. As for squirrels, I understand your concern but they cannot get in through the grid. We have had a few climb on ours but they have not been able to get in, just climb on top!
LikeLike
OP here (Karen of the defunct CatandCaboodle.com): Yes, squirrels can absolutely get inside, but if they decide to fight with the cats, they will unfortunately lose.
So can birds. We woke up one morning to find a bedroom completely covered in bird feathers – the poor soul landed inside the enclosure sometime in the early morning and a cat caught it, brought it back into the house, and, well, you know the rest.
LikeLike
How do you attach it to brick? We have a brick house and there are gaps between the house and the catio. We ordered brick clips but they do not fit our bricks. We tried hot gluing hooks to the brick but they came off. We don’t want to drill holes for anchors. Any suggestions would be much appreciated. Thank you.
LikeLike
Ours is not attached to the house, we completely boxed it in with the panels and just have it up against the house. We did attach it to a wood base but with the zip ties it is very very sturdy. Perhaps you can send some pictures? Does this make sense?
LikeLike
Great reading I think you just earner yourself a follower!
LikeLike
Thank you! I had almost given up on a catio to put litterbox outside, accessed from inside via a window insert. One of the companies even told me that in order for the cats to get in it I have to carry them around the house and put them in it. That’s crazy since I’m not a mindreader to know when they need to use the litterbox. I’m totally inspired to find these and start experimenting. Huge thanks!
LikeLike
where can I get it in germany??
LikeLike
Amazon.de – https://www.amazon.de/Relaxdays-Drahtgitter-DIY-Regalsystem-W%C3%BCrfelregal-F%C3%A4chergr%C3%B6%C3%9Fe/dp/B07JQFST98/ref=sr_1_26?dchild=1&keywords=Draht&qid=1615975833&s=kitchen&sr=1-26
LikeLike
I have been using these for about 20 years as bookcases and I never thought about it for my cat until I saw your blog today. I am going to set it up outside for her now that I have seen all your blogs – thank you all VERY MUCH!
LikeLike
You are welcome! I am glad you found the blog and please send pictures!
LikeLike
Thank you so much for the very detailed information, and for including so many variations! I have found another way to use this approach. I have a hobby area that has no door, and realized that if these structures can keep kitties in, they can also keep them out. I’ve started putting the barrier together today. Thanks again!
LikeLike
Has anyone built a roof for their catio? I built the same storage unit catio a few yrs ago and its great, except we get a lot of rain here in Seattle. I put a tarp on it, and it just weighed it down almost collapsing it. I guess I need a slanted roof so the rain runs off….
LikeLike
Hi Nancy, I am in Everett, we never put a roof on it. The cats went out in the rain or whatever but we did think about it. If we would have, I think we would have bought that corrugated plastic which still lets some light in.
LikeLike
reading up on these they say not to leave outdoors for a long period of time due weather. I would like to know why also could you please email me the reply. Thank you
LikeLike
Dawn here, ours has been up and sturdy as heck since 2012. It is still out there. We are going to reconfigure it to relocate it. I am in Everett Washington and it has been exposed to the elements the whole time. We occasionally replace some zip ties but that is pretty much it.
LikeLike
Hi there! My name is Karen, the owner of CatandCaboodle.com who wrote the original instructional post. I never said not to leave them outside – in fact, I said the opposite. Ours lasted for years in sun, rain, and snow before we moved. We were in southern WA near Portland; the winters are even rainier there than in the Seattle/Everett area where I now live. The worst thing that ever happened to ours (which I also mentioned in further posts) was that the corners where the hubs attach start to rust. But that was only cosmetic, not structural.
LikeLike
Had mine out in the weather (rain and snow WNY) and have had zero problems for three years. I even built one in the house around the litter boxes because my last rescue cat slings litter EVERYWHERE. The inside catio “maze” pretty much fixed that issue. Amazon sells a different size, so be wary. Theirs is WAY bigger.
LikeLike
Thanks everyone.I don’t remember seeing it in the post about it being outdoors. That’s was on the seller comments on the product. There are so many brands of these cubes and it’s a hard to find the best one. But from the comments I”ve received I now know better, I can leave it out on my deck. Once again thanks
LikeLike
one more question how does the connectors goes on, I’m seeing two different ways of possibility. I’m seeing 4 slots around the bottom of the connector then it looks like a cross on top of that. please if you have a picture of the position of the connectors. If not maybe explaining with a little more description.
Thanks so much for this project now my babies will get some fresh air.
LikeLike
I just published a new post with pictures and more details. I hope that helps!
LikeLike
Sure, there are actually 3 different ways to connect the ones I have. Depending on if you are connecting horizontally, vertically, or on the corners. I will see if I can add photos here. If not, I will do a quick post with the pictures.
IMG_1830.JPG
IMG_1828.JPG
IMG_1829.JPG
LikeLike